
WordPress is an open-source Content Management System (CMS) that can be downloaded and set up without charge using the cPanel Softaculous Apps Installer. The purpose of this tutorial is to demonstrate how, with just a few clicks, you can have a secure and uncluttered WordPress installation that is ready for content creation. It is intended for both novice and experienced users.
However, you will want a domain name and a reputable web hosting company that is familiar with WordPress before moving forward with the installation of WordPress. The Hosterion hosting platform removes the difficulties of website setup and enables you to go live in a matter of minutes, from the quality of service, growth, and engineering to sheer speed, security, and site performance.
Table of Contents:
Access the Installation page in Softaculous
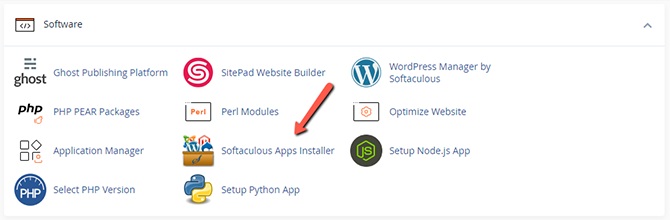
- Naturally, before beginning the real installation, you must access the Softaculous auto installer, which is conveniently located under cPanel → Softaculous:
- Once you access this feature, you will need to either search for the WordPress platform via the Search box at the top left side of the page or find it in the Blogs category located in the left categories view:
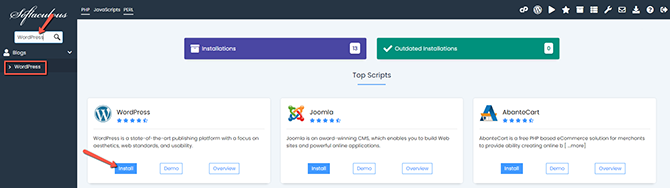
The popular programs slider on the main Softaculous page also includes WordPress, so take note of that. Whatever method you choose, you will always end up on the application’s installation tab. Click on the Install Drop-down → Quick Install/Custom Install. Quick Install includes basic options, while Custom Install lets you predefine more aspects of your website.

Configure the Installation
Quick Install (Recommended)
You must set up the pre-installation choices after you have accessed the setup interface. They are conveniently divided into a few sections, which we will go over right away.
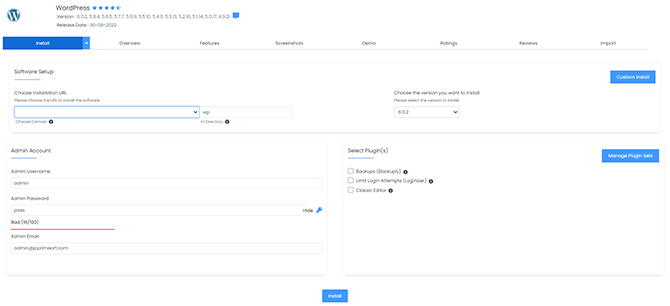
- Choose Installation URL – The actual domain or subdomain that will be used to access your WordPress website. Most users prefer to install WordPress in the root directory of their domain, such as domain.com.
- In Directory – Your WordPress website should be located in the named subfolder. You must leave this option empty if you want WordPress to be installed directly on your domain or subdomain because it is, by default, set to “wp.”
- Choose the Version you Want to Install – Select your starting WordPress version. We always recommend the latest WordPress version available for security and performance reasons.
- Admin Username – The actual username you would like your admin user to have.
- Admin Password – The password for the admin user. Please make sure that the password you are entering in this field will be at least Strong type.
- Admin Email – The actual email on which you will receive notifications regarding your website.
- Once you’ve gone over everything, you can finalize your WordPress installation by clicking on the Install button.
Custom Install
Once you have accessed the Custom Install setup interface, you will need to configure the pre-installation options. They are conveniently separated in a few sections we will review in the next lines of this tutorial.
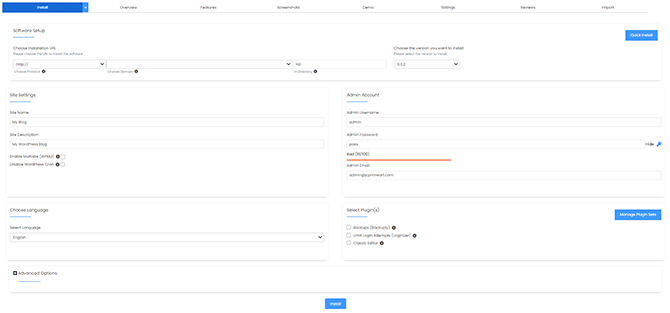
- Choose Protocol – You should choose via which of the provided protocols your WordPress website will be available. If your site has SSL and HTTPS, then you can select https:// or https://www. as protocol.
- Choose Domain – The actual domain or subdomain via which your WordPress website will be available. The majority of users want to install WordPress in their domain’s root directory, like domain.com.
- In Directory – The name of the subdirectory in your WordPress website should be located. Note that by default is set to “wp,” and if you would like WordPress installed directly on your domain or subdomain, you will need to leave this field blank.
- Site Name – The actual name of your WordPress website. Not to worry, you can easily change it from your WordPress admin area after installation.
- Site Description – The content description for your website.
- Enable Multisite (WPMU) – By ticking this checkbox, you will make Softaculous deploy your WordPress platform with the enabled WPMU (Multiuser) option.
- Admin Username – The actual username you would like your admin user to have.
- Admin Password – The password for the admin user. Please make sure that the password you are entering in this field will be at least Strong type.
- Admin Email – The actual email on which you will receive notifications regarding your website.
- Select Language – This entire section contains a single field related to the language which you would like your WordPress to use. The list of supported languages is quite big, and most probably, you will find your native language there.
- Limit Login Attempts (Loginizer) – increases the security of your WordPress website.
- Classic Editor – for users wanting the pre-Gutenberg editing options available in versions after 5.x.
- Database Name – Softaculous will automatically assign a value to this option; you should only alter it if you have prepared something else, like a new database. You can check our cPanel database related tutorials if you’re unsure how to add a database and user to it using your cPanel.
- Table Prefix – If you host multiple WordPress installations, each of their databases will require a unique prefix to maintain separation.
- Disable Update Notification Emails – This will disable the notifications Softaculous sends to you when an update for your website is available.
- Auto Upgrade – Enables the Softaculous auto installer to apply updates whenever such are available automatically if the checkbox is ticked.
- Auto Upgrade WordPress Plugins – Checking this option will allow automated plugins to upgrade upon a platform version update.
- Auto Upgrade WordPress Themes – Ticking this checkbox will enable automatic themes to upgrade when the installation script is updated.
- Automated Backups – This option is for configuring an automatic backup service for your WordPress-based website. The available backup options are related to the frequency they should be performed.
- Backup Rotation – The number of backups the automatic backup service should keep for your website.
Complete the Process
When you are done setting up all of these settings, the installation process can begin. Click the Install button at the bottom of the page to get started.
You will get all the information you need to access your newly activated WordPress instance after a brief wait. To avoid damaging your WordPress installation, make sure you don’t close the window throughout this process until the progress bar hits 100%.
Congratulations! The WordPress application has been successfully deployed using Softaculous.
If you need further assistance, we are at your service. FastComet offers free professional WordPress installation on all hosting plans.